How Do I Get Rid of Black Mold
- HDIGRO Team

- Feb 24
- 7 min read

How do I get rid of black mold safely with a simple step-by-step plan:
Decide if it’s DIY or pro-level, use the right PPE, clean hard surfaces correctly, discard unsalvageable porous materials, and fix moisture fast so it doesn’t return. Helpful tools: N95 respirators, nitrile gloves, a hygrometer, and a dehumidifier.
Important disclaimer: Mold cleanup can affect health and safety. If you have asthma, immune suppression, severe allergies, or symptoms that worsen around mold, consult a clinician before DIY cleanup. If you suspect electrical hazards, sewage contamination, or widespread hidden mold, hire a qualified professional.
First, let’s get one thing straight about “black mold”
When most people say black mold, they’re usually talking about Stachybotrys chartarum—but here’s the catch:
Color doesn’t tell you how dangerous a mold is. Many molds can look black, green, brown, or gray.
You usually don’t need testing to start solving the problem. If you can see or smell mold, the fix is the same: remove mold and fix moisture.
In my experience, homeowners get stuck because they chase the “perfect identification” instead of doing the two things that matter most:
stop the water, and
remove/clean the affected materials properly.
The quick decision: Is this DIY… or “call a pro”?
Use this fast checklist.
DIY is usually reasonable when:
The visible mold area is small (think: a patch on bathroom caulk, a window sill, a small section of drywall surface)
You can fix the moisture source quickly (leaky sink trap, bathroom fan issue, condensation)
You can work safely with PPE and ventilation
Call a pro now if any of these are true:
The mold covers a large area or keeps spreading
You suspect hidden mold behind walls/ceilings or under flooring (musty smell + no obvious surface source is a classic clue)
There was flooding, sewage, or long-term water intrusion
Anyone at home is high-risk (serious asthma, immune issues, infants, elderly)
You’ll need demolition (removing drywall/insulation) and proper containment
Pro tip: Even if you plan to hire help, do the “moisture stop + dry-out” steps immediately. Mold loves delay.
DIY vs. Pro Remediation (simple comparison table)
Situation | DIY approach (best for) | Professional remediation (best for) |
Small, visible mold on hard surfaces | Scrub with detergent/water, dry completely | Overkill unless it keeps returning |
Porous items with deep growth (drywall, insulation, carpet pad) | Usually remove & replace | Pro if widespread, hidden, or structural |
Hidden mold suspected | Limited DIY investigation | Pros can open cavities safely, contain dust |
Health risk occupants | Not recommended | Strongly recommended |
Recurring mold despite cleaning | Moisture diagnosis + repairs | Pro + building science assessment |
EPA emphasizes: porous materials may need to be thrown away because mold infiltrates and can be impossible to remove completely.
The supplies that actually matter (and what to skip)
You don’t need a garage full of chemicals. You need PPE + containment + drying power.
Must-haves (practical, not fancy)
N95 respirator (NIOSH-approved)
Gloves (nitrile/vinyl/rubber)
Eye protection (goggles)
Detergent + water (simple, effective for hard surfaces)
Plastic sheeting + painter’s tape (to isolate a small area)
HEPA vacuum (ideal) or a standard vacuum only after surfaces are cleaned and dry
Dehumidifier + fan (drying is half the battle)
Hygrometer (tiny tool, huge clarity—aim to keep indoor humidity controlled)
What to skip (usually)
“Miracle mold sprays” that promise permanent prevention without fixing moisture
Overpaying for routine mold testing when you already have visible growth
Safety rules you should not bend
This is where people get hurt.
Never mix cleaning products. CDC specifically warns: do not mix bleach and ammonia (toxic vapors).
Wear an N95 the right way (seal matters).
Don’t “paint over” mold. CDC’s guidance is blunt: don’t cover it—remove it and fix the water problem first.
If electricity + water are involved (flooded outlet area, wet wall with wiring), stop and get help.
Step-by-step: How to get rid of black mold (DIY method that actually works)
Step 1: Stop the moisture (the real root cause)
The EPA’s message is consistent: the key to mold control is moisture control.
Common moisture sources:
Bathroom humidity + weak/unused exhaust fan
Leaky supply lines, sink traps, toilet seals
Window condensation (especially in winter)
Roof flashing leaks
Poor crawlspace ventilation or vapor barrier issues
Goal: get wet areas dry within 24–48 hours whenever possible to prevent mold growth.
Step 2: Decide what you’re cleaning vs. removing
Here’s the rule of thumb I trust:
Cleanable (usually)
Tile, sealed stone, glass, metal
Solid, non-porous plastics
Some sealed/finished wood (depends on penetration)
Usually remove & replace
Drywall that’s soft/crumbly or has growth that likely penetrated
Insulation
Ceiling tiles
Carpet and carpet pad with mold
Pressboard/particle board furniture
EPA notes absorbent/porous materials may have to be discarded because mold can fill crevices and be difficult or impossible to remove completely.
Step 3: Contain the area (so spores don’t travel)
For a small DIY job:
Close doors, open a window if it helps ventilation
Lay plastic to protect floors
Bag debris as you go
If you’re removing moldy materials, sealing contaminated items before moving them helps reduce spore spread (EPA discusses packaging/containment practices for contaminated materials).
Step 4: Put on PPE before you disturb anything
Minimum protection for small areas often includes:
Gloves
Eye protection
N95 respirator
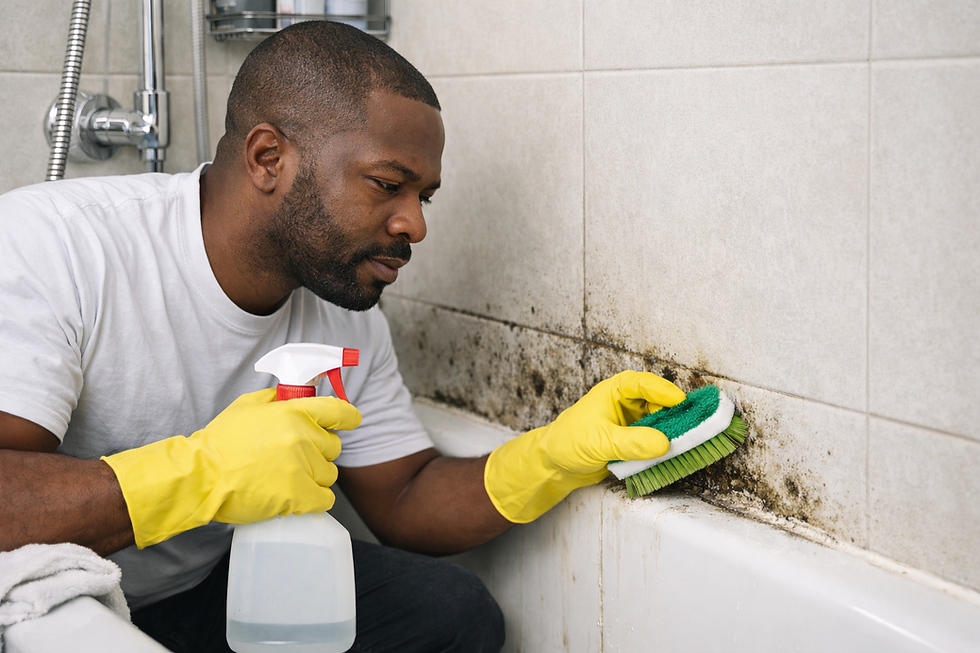
Step 5: Clean hard surfaces the right way
CDC/EPA-aligned approach:
Scrub with detergent and water
Remove all visible mold
Dry completely right away
This sounds too simple—until you realize most people do Step 1 and skip Step 3.
Step 6: Dry like you mean it
Drying is not “leave a window cracked.” Drying is:
Fan for air movement (if safe)
Dehumidifier to pull moisture out of the air
Keep humidity controlled so regrowth doesn’t happen
EPA guidance emphasizes drying wet areas quickly (often within 24–48 hours) to prevent mold.
Step 7: Dispose of unsalvageable porous materials safely
Bag materials before moving them through the home
Avoid tearing/dragging (that aerosolizes debris)
Clean the surrounding hard framing where appropriate, then dry thoroughly
Step 8: Don’t reintroduce moisture (prevention setup)
This is where your “mold-free” win happens:
Bathroom: fan use, humidity tracking, wipe-down habits
Basement: dehumidifier + drainage checks
Windows: condensation control (humidity + airflow)
The most common mistake I see (and how to avoid it)
Mistake: treating mold like a “stain” instead of a moisture and materials problem.
People scrub, it looks better, and two weeks later it’s back—because:
the wall cavity is still damp,
the bathroom stays at high humidity,
or the drywall/caulk is contaminated below the surface.
Fix: use the If–Then guide below like a detective.
If–Then troubleshooting: why the mold keeps coming back
If the mold returns in the same exact spot…
Then you still have a moisture source:
Micro-leak (supply line, drain seal)
Condensation point (cold corner + high humidity)
Poor ventilation (bath fan not venting outside)
If you smell mustiness but don’t see mold…
Then suspect hidden areas: behind walls, ceilings, crawlspaces, attics.
If it’s on caulk or grout in a bathroom…
Then the problem is often:
humidity staying high too long
fan not used long enough
caulk already penetrated → removal/recaulk is sometimes smarter than endless scrubbing
If it’s in a basement…
Then check:
indoor humidity
drainage and downspouts
grading (water against foundation)
sump pump function
If multiple rooms are affected…
Then treat it like a whole-house moisture/ventilation issue, not a “one wall” issue.
Do you need mold testing?
Usually, no.
EPA: if you have visible mold growth, sampling is often unnecessary.
Public health guidance commonly notes testing doesn’t add useful information for routine household cleanup—fixing moisture and cleaning/removing materials is the priority.
When testing can make sense:
Medical evaluation needs documentation
Legal/landlord disputes
You suspect hidden mold and need targeted confirmation
You want post-remediation verification (more specialized)
A simple “Black Mold Cleanup” checklist (copy/paste template)
Before you start
Identify and stop the water source (leak/condensation/humidity)
Confirm the area is small enough for DIY; otherwise call a pro
Gather PPE: N95, gloves, goggles
Protect floor + isolate area
Cleanup
Scrub hard surfaces with detergent + water
Remove all visible growth
Dry immediately and thoroughly (fans/dehumidifier if safe)
Bag and discard porous materials that can’t be fully cleaned
After
Keep humidity controlled; dry any wet areas within 24–48 hours
Don’t paint/caulk over mold before moisture + cleanup are complete
Re-check the area over the next 2–4 weeks
Cost-saving insights (without cutting corners)
Don’t overspend on testing first. If you see mold, start with moisture control + proper removal/cleaning.
Spend money where it reduces repeat work: bath fan improvements, dehumidifier, leak repair, humidity monitoring.
Remember: “stronger chemical” rarely beats “better drying.”
FAQs (real questions people ask)
1) Is black mold always toxic?
Not necessarily. Many molds appear dark, and color doesn’t reliably indicate danger. Treat all mold as a problem to remove safely and fix the moisture source.
2) What’s the best cleaner for black mold?
For most hard surfaces, detergent + water + scrubbing + thorough drying is the core method recommended in major guidance. The “best cleaner” is the one you use correctly and follow with complete drying.
3) Can I just paint over it with mold-killing primer?
Don’t. Guidance warns painting or caulking over mold won’t prevent it from growing—fix moisture and remove mold first.
4) Do I need to test to see what kind of mold it is?
Usually no. If there’s visible mold, testing is often unnecessary for deciding what to do next (remove mold and fix moisture).
5) When should I throw materials away instead of cleaning?
When the material is porous/absorbent and mold has likely penetrated (carpet, insulation, ceiling tiles, moldy drywall), it may be difficult or impossible to remove completely, and replacement is often the correct move.
6) How fast can mold grow after a leak?
Guidance commonly emphasizes drying wet areas within 24–48 hours to prevent mold growth.
Next steps and key takeaways
If you only remember five things, make them these:
Moisture control is the key—stop the water and control humidity.
Dry fast (24–48 hours) to prevent growth and regrowth.
Scrub hard surfaces with detergent/water and dry completely.
Porous materials may need to be discarded—don’t waste weeks trying to “save” moldy carpet pad or crumbling drywall.
Protect your lungs and eyes with proper PPE (N95, gloves, goggles).

Comments